Pages

Saturday, May 26, 2012

The Hike to Ijen Crater, East Java – Indonesia (Part II)

After a long day on the road and finally settled for the night at Catimor Homestay, on the next day, we finally began with the hike at 6.04 am which was as bright as 7ish am in Malaysia time. The track was in fact way better than the bumpy, crazy road we took last night. Haha. Signs of volcanic soil was pretty evident around the area as the soil was black and I assumed it got to be very fertile indeed.
Black volcanic soil and the beginning of the steep hike
After a short while of walking on a fairly flat land, the 45 degree angle trekking began for the next 2 km onwards. As long as you keep on a slow but steady pace, you will get there in no time at all.
The baskets of sulphurs carried by the miners
The steep trekking would not be as difficult as you might think as you will be entertained or rather distracted with some baskets of sulphurs the miners had left along the path and also the WC (water closet) signboards can be found pretty easily too. When there is an urge for nature calls, be happy enough to make use of the 100% environmental friendly toilet (WC) which in another word – peepee by the bushes :)
WC - the bush toilet
After some photo snaps, persistent walking and breaks along the way, we made it to the Pos Penimbangan ( the sulphur weighing area) in about 53 minutes. We had a short break for more tummy fillers on chocolates, apples and water and of course an opportunity to snap more photos.

Post Timbang Candi Ngrimbi - sulphur weighing post/ canteen for mining workers
Sulphur carvings souvenirs selling at the weighing post
A short while later, off we went for another 1km trekking towards the Ijen crater. The track was rather flat at most times and it was easier to walk rather than the previous 2 km track. As for photo shooting, this is the time to start utilising your cameras as there are certainly a lot of beautiful shots you can come out with around this area.


The landscape changes at this point
We certainly took our time on the photo session and a group of us got to the crater last. There was simply no rush really as I felt that you need to take the time to be in the moment and appreciate everything while you were there.

Ijen Crater - the Lake view on the right side
Finally, we arrived at the top of Ijen crater. There weren't really a lot of people around and the sulphuric lake was not totally visible due to the clouds which was alright for us because we were hanging around there for quite sometime waiting for the clouds to make way for more views of the amazingly beautiful lake.It was in fact probably one of the best days to be up up there since the wind was blowing further away from us. Hence we were free from having strong smelling sulphur odour sticking to our clothes and the only time I had actually sensed a bit of sulphur lingering in the air was only for a short few seconds when the wind blow during our short hike up. In short, we were a lucky bunch and thank God for that.

Truthfully, I thought I could just hang around up there a whole lot more and that was why the three of us got left behind snapping more photos of Ijen crater and its surrounding. I would say I could never get enough of the whole view and the fact that it was the second volcanic mountain we had climbed in two days time, the feeling was just incredible. It is hard for me to put down words on how things are like and this is exactly the kind of thing you need to experience for yourself to truly appreciate the nature of the environment.

Sulphur with the constant smoke gushing out of it

If you look closely, you will see outline of the lake at the far left of the picture. On better days, the lake will be in high visibility at this point
After what I felt like a short while up there at the peak of Mount Ijen, we finally made our way down. The last 2 km descend could be hard for you knees and the trick is the hike down on a zig-zag, make small quick steps and take a lot of rests so that you don't strain your knees too much which I needed to be careful about.


Thankfully, we all made it down safe after 3 hours 46 minutes at 9.51 am totally in good shape but obviously famished yet again. Next, right after a quick toilet run and warming down ( I had my warmed up in the hotel room actually hehe), we were served with the Indonesian speciality menu which was yet another Indo Mee and more tea for our second breakfast of the day.


All in all, I would say the track up Ijen crater was reasonably easy as long as you are slighty fit and it was safe but still do be aware of any volcanic eruption news or warnings just to be on the safe side. For our trip, we had a guide with us who was actually the same girl we had guiding us throughout the trip and us being Malaysians and she an Indonesian, I think all of us enjoyed each others company. Hence on that note, it was a good trip after all.

We bumped with another group of Chinese Malaysians from KL too during the hike down and yeah, it was good to see some familiar faces there. :) The next burning question is would we travel all the way the crazy road to make it down to Ijen Crater again next time? As for this moment now, I will have to pass on that idea but then again, who knows I may make a comeback if the timing is right and the company is good. :)

Trip to Ijen Crater, East Java – Indonesia (Part 1)

The road trip to Catimor Homestay, Jember


  • Travel time on the road from Madakaripura Waterfall to Catimor Homestay which is located at the coffee plantation took about 9 hours ( I think so ).

  • We were back on the road again after the waterfall at about 1ish pm and we headed straight towards Ijen.

  • We had lunch at a restaurant along the way at about 3-4pm and by then we were famished. Some of us had Nasi Ayam Penyet, one person had Cat Fish Rice while myself and another friend got ourselves Nasi Bebek – which was a 'not so smart' choice. Hehe. But then again, we were super hungry and you just have to chow it down man!

    Nasi bebek, Indonesia

  • Maybe somewhere around 6pm in pitch black we began to travel through the rough, gravel road which seemed to be out of nowhere. We were heading straight to the coffee estate and surprisingly in the dark, there were big lorries passing through the road, one stray dog and even people with overloaded motorcycles commuting on that very same road. Did I mention it was pitch black and it felt almost like we were in a jungle somewhere?

  • Arrived at the Rest House somewhere around 9ish pm, we got our keys to our rooms, shortly after we feasted on a lot of things on the dinner table.

  • After dinner, I showered while my roommate collapsed on the bed out of exhaustion. She had a hard time with all the crazy, rocky motions in the car (motion sickness) and she hardly had anything for dinner. While being me, I just can't really sleep and started repacking my bag, drying up the wet clothes from the waterfall and doing other nonsense instead. I slept for maybe 2 hours or so and woke up just before the alarm rang at 4am. Great!

  • Breakfast was a choice of black coffee ( not Luwak Coffee though) or tea, one hard boiled egg and a bread sandwich of butter and chocolate rice – which was not technically everyone's favourite but we (some of us) chowed it down anyway. My roomate got with her a Maggie Cup – Chicken flavour and I ate a bit of that too. :)

  • Next, we checked out of the hotel, loaded bags into the car and after a short drive through the coffee plantation and one guard post later (which the driver 'gave' some money and one hard boiled egg. There were probably about 5 to 6 guard posts that we passed through since last night and imagine the amount of 'token' the driver had paid which was of course billed on us. Simply unbelieveable!

  • Arrived at the entrance of the park – Taman Wisata Alam Kawah Ijen. The registration counter was closed and the crater is supposed to be closed anyway – at least it was closed for the suplhur miners. As long as we, visitors do not get down to the crater, we 'should' be fine and safe.

  • Next, the beginning of the hike up towards Ijen Crater which will continue in the next post.

    Wednesday, May 23, 2012

    Photo Travel : Madakaripura Waterfall, Probolinggo, Jawa Timur, Indonesia

    Madakaripura Waterfall in Probolinggo, Jawa Timur ( East Java) has to be one of the most beautiful waterfall I have ever seen up until now. For those who make a visit up to Mount Bromo, I would really recommend for you to add a visit down to Madakaripura Waterfall in your next itinerary.

    [caption id="attachment_2896" align="aligncenter" width="540" caption="Madakaripura Waterfall - view from afar"][/caption]


    [caption id="attachment_2899" align="aligncenter" width="540" caption="Madakaripura water pouring heavily"][/caption]

    [caption id="attachment_2901" align="aligncenter" width="540" caption="Super murky water and the camera lens got a bit of water on it. Murky water = leave ASAP because water level is rising and that's dangerous!"][/caption]

    [caption id="attachment_2902" align="aligncenter" width="540" caption="It's getting cloudy, murky water, heavy water flows - few more last snaps to go and leave quickly people!"][/caption]


    Madakaripura Waterfall - it is simply beautiful. I know the camera work here isn't really fabulous but we are really thankful for the waterproof digital camera that Miss M brought along with her other camera. All in all, it was a great short trip to the waterfall. Maybe in total we spent about 15 minutes max around the waterfall and since the weather wasn't looking good, the water getting totally murky and the amount of water falling from above was immense, it was a good call that we didn't spend a lot of time around the waterfall and thankfully we all got back to the car safe and well.

    *** Note:

    - If the water level would have been on a safe level, the water at surrounding the waterfall will be in a hue of green-ish blue in colour. Even though we brought along a so called guide, he didn't mention a single word about getting out of there quickly what more briefing on the track. Hence, do come with some basic river or water level knowledge along with you.

    - The walk towards the waterfall is fairly easy. It takes probably about 30 minutes or so ( wasn't really timing the walk) to get to the waterfall. However, do be aware of local men who would be asking to guide you (with a fee of course) or some men who seemed to be really nice to help you along the way (wading through the streams) because in return they will be asking for some money. In our case, our tour operator had already assigned a person to guide us which in my opinion was totally unnecessary.

    - Do come prepared to be extremely drenched  and there will be locals trying to rent to you umbrellas. So yeah, you can come equipped with a raincoat, proper sandals, umbrella and a waterproof casing for your camera or a waterproof camera. Water is also essential and make sure you pack that in your bag.

    - Safety first and it was certainly one of those ' heaven on Earth' moment as you reach the waterfall.


    Friday, May 18, 2012

    10 Things You Need to Know about Mount Bromo, East Java, Indonesia | Mt.Bromo, Jawa Timur

    10 Things You Need to Know about Mount Bromo, East Java, Indonesia are :

    [caption id="attachment_2859" align="aligncenter" width="640" caption="Mountain on the left with a bit of smoke at the top is Mt. Bromo. Picture is captured from Mount. Penanjakan."][/caption]

    1. To tell you the truth, none of us knew about Mount Bromo until we were told about it while going for our maiden hiking expedition at Mount Kinabalu, Sabah. A fellow hiker, Akmar introduced to us to this absolutely beautiful and picturesque view of a volcanic mountain called Bromo or Mount Bromo straight out from her iPhone. We wow-ed over Mt.Bromo right at that instance and we told ourselves, we really need to go there and we finally made it there after 2 years which was on April 30th, 2012.

    2. To get to Mount Bromo, you need to fly into Surabaya, East Java (Jawa Timur), Indonesia and take a couple of hours of car ride to Probolinggo province ( I think) and then exchange into a jeep to get you higher up the rough road condition up the mountain. When I say "rough road condition", brace yourself for a super bumpy, almost roller coaster-like jeep ride. It was awful and if you needed to pee, forget about it. You will almost certainly pee in your pants with all those crazy bumps and bounces.

    3. Akmar did mentioned that you can hike Mount Bromo by going on a horse ride and that's exactly what we did. It cost us about IDR 90,000 (approx. MYR30 or USD10) for both ways going up and down the volcanic mountain. I can't remember the exact duration we were on the back of the horse but it felt really long maybe about 15 minutes one way. Since it was our first time riding a horse, it was the most awesome thing anyone could have ever done in their life. At that moment, it wasn't really about the fact that we were literally hiking an active volcanic mountain, but we were more excited with the whole idea of going horse back riding.

    [caption id="attachment_2861" align="aligncenter" width="1600" caption="Mt Bromo horses with their guides and the jeeps"][/caption]

    The horse riding episode is certainly something one should look forward to doing at Mt. Bromo and no worries for first timers, the horse is guided with his owner and just make sure you sit up straight, go along with the rhythm of the horse, hold on the rope tight and simply enjoy the ride and view!

    4. Make sure before you get on the horse ride or if you can't care for horse adventure and splurging money are not in your agenda, just be sure to clear your bladder before you begin your hike. There is a toilet right at the parking area with a typical standard fee of Indonesian toilet run - IDR2000. Bring your own TP or wet wipes if washing with water isn't your thing and the toilet is in okay standard.

    5. The weather at Mount Bromo is just nice but it can be very dusty to go all the way up the mountain. It only get worse when you will be hiking right next to people on horses because there is only one track to go up and down. Your best choice of clothing is to wear a long sleeve shirt and pants, sunglasses ( to keep the dust out of your eyes) and a bandana ( to function as a mask) or get yourself a proper mask to cover your nose. Do not be surprised when you blow your nose right after this hike, you'll be seeing black dusty ashes coming out from your nose. So do make sure, you remember to clean up the nose right after. Haha.

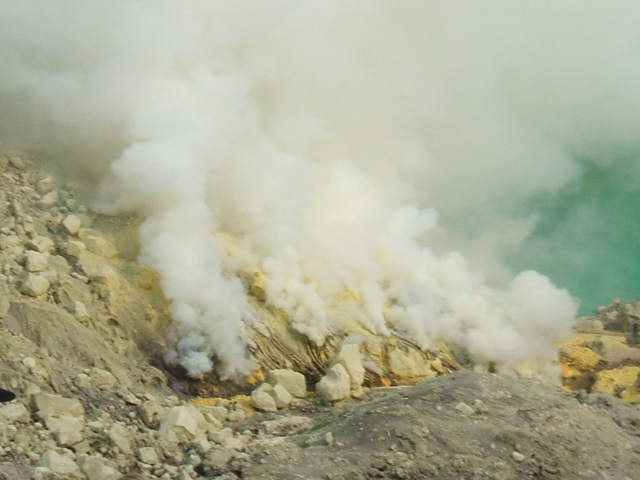
    [caption id="attachment_2863" align="aligncenter" width="640" caption="Mount Bromo and it's very much alive smokey crater."][/caption]

    6. The horse ride will only take you to about 3/4 of the way up. The rest of the way, you will need to take the dusty ashen stairs which was fairly okay, not difficult to climb. You will have the view of the Bromo Crater right at the top and be careful right up there. There is no divider to protect you from falling down into the crater so don't get all too excited with the camera works and do watch your steps.

    7. I would say, all around 360 degrees view from the top of Mount Bromo was absolutely amazing. The place is totally barren and almost desert-looking with grey ashes covering pretty much everything.

    [caption id="attachment_2862" align="aligncenter" width="540" caption="Mt. Bromo view from the top facing away from the crater. If you look closely on the front of the picture, you'll see the trail of people climbing the stairs."][/caption]

    *picture by Miss M

    8. You can avoid the stairs when you are descending down from the mountain by going all adventurous, trailing down the mountain and kick more dusts all over you just like this guy in the picture below :

    [caption id="" align="aligncenter" width="640" caption="Mt Bromo"][/caption]

    * It's no doubt risky and whatever you do, safety first!

    9. You will be bombarded with the many local folks who will come up to your face with bunch of Bromo tshirts for sale. You can however, choose to say no and walk away as quickly as possible or ended up buying a bunch of tees which will be way too small for your size. The last I checked, L size is equivalent to the standard S size. So make sure you check the size out first before buying.

    10. Despite the cost for the horse ride was just IDR 90K, I'm pretty sure you will want to give the guides an extra tip for all their hard work or probably just something extra for the horses too. Their job is really tough and going through that kind of working condition everyday, climbing up and down the mountain multiple times a day while breathing black volcanic ashes day in and out is really one heck of a job to do.

    [caption id="attachment_2860" align="aligncenter" width="640" caption="Mt Bromo"][/caption]

    All in all, if you are looking for a chance of a lifetime to experience stepping foot on one of the most beautiful and scenic volcanic mountain ( in my rating that is), Mount Bromo located just a couple of hours away from Surabaya, East Java, Indonesia is the place you certainly need to go.


    *Note: Surabaya is just a couple of hours away from Bali. I personally think adding Bali as your next travel destination after visiting Surabaya by travelling via land using train, ferry and van is totally going to be one heck of a road trip and you should seriously consider doing just that.

    Saturday, May 12, 2012

    Stuffs You Need To Know at Indonesia Immigration

    Just earlier this month, I had my very first visit to Indonesia and of course, being totally foreign to it ( not really actually because being Malaysian, we are some what used to Indonesian), I was really looking forward to begin my short adventure in Indonesia.

    Our very first encounter with anything Indonesian began right at the door of our airplane. Since it was a flight going into Indonesia, for all the obvious reasons, all the flight attendants were clearly Indonesians. There was a bit of a loud conversations going on in Indonesian right at the entrance of the airplane where there was a bit of a mixed up about where to store the baby's stroller in the aircraft. At that point, I realized that Indonesian speaks super fast and I wonder if the stewardess was being loud or angry or everyone in Indonesia just talks that way, which I doubt it is. That short drama done with, we found our seats and the plane took off.

    Since we were travelling on a budget, most of us didn't check in our bags and that saved me about RM40 for the total ticket price. But actually, that is not even an issue that I'm trying to bring up here. The next thing we knew, we were queuing on the Foreigner lane at the immigration. I read some travel tips on some websites which mentioned that for smooth process at the immigration, try to look for immigration officers that doesn't look like he's going to eat you (which can be tough to come by if you are going into Germany), he or she looks nice and friendly or if you can catch him/her flashing a smile to that person at the counter, then probably that is the lane you should be queuing up to.

    I randomly picked a woman officer behind the counter probably because it was the only two lanes available anyway and you have to pick one. While at the queue, I saw some people putting their four fingers on the fingerprints detector while others didn't do that which was something odd and new to me. Probably I haven't travelled that much to places in South East Asia that the idea of having your all five fingers on both hands saved in another country's immigration database is something that I got me saying in my mind, " Man, these people are serious dude!".

    Then it comes to my turn. Apparently, for anyone who is a first time visitor into Indonesia, it is mandatory to do all the five fingers on both hands fingerprints detection inclusive of a face image too. There is an instruction card placed just above the fingerprints detector machine but the immigration lady was obviously hustling everybody and there's no way for you to read the instructions properly at the counter.

    First, you will be asked to put your 4 fingers of your right hand minus the thumb at the detector which I dutifully did. Of course my hands decided to slip out of the detector and the next second, the lady was repeating in an irritate voice for me to put my hands back again. Next was the 4 fingers of your left hand minus the thumb and then, both thumbs together ( I think or was it separately, I can't remember) and finally look at the tiny camera at the counter. And then I thought I was done but no.

    Our first destination was addressed at this place called Malang which you had to fill up on the form. Confidently, seeing that I'm a Malaysian, the immigration lady spoke Indonesian to me. Thankfully, I understood her questions and told her that we are staying overnight at Malang because we will be at Bromo tomorrow morning. She also asked if the next person behind me is my friend and of course it wasn't. My friends were lining up just behind that woman and of course I was too eager to get through the immigration that I had walked away and only realized that probably I should mentioned that the other two behind the line, we are travelling together. Anyway, all of us got through fine at the immigration, grab our bags and off we go looking for the rest of the gang who had flown in on an earlier flight.

    This post could go on again about the how you will be literally shoved a bunch of telephone sim cards at your face right at the entrance of the airport. Just a reminder for you, these people are pretty persistent about selling their stuffs and yes, they will want to hang around you even you have clearly said, you didn't want a sim card. So the best options is to simply ignore them until they flee for their next victims (oops, customers).

    So there you go, if this is your first time visiting Indonesia, do expect those fingerprints and face detection right at the immigration counter. Just in case you do not speak Malay or Indonesian and didn't have the time to read the instructions for the fingerprints detection, I hope this post will help.